29 | 虚拟文件系统:文件多了就需要档案管理系统


讲述:刘超
时长18:04大小16.55M
上一节,咱们的图书馆书架,也就是硬盘上的文件系统格式都搭建好了,现在我们还需要一个图书管理与借阅系统,也就是文件管理模块,不然我们怎么知道书都借给谁了呢?
进程要想往文件系统里面读写数据,需要很多层的组件一起合作。具体是怎么合作的呢?我们一起来看一看。
- 在应用层,进程在进行文件读写操作时,可通过系统调用如 sys_open、sys_read、sys_write 等。
- 在内核,每个进程都需要为打开的文件,维护一定的数据结构。
- 在内核,整个系统打开的文件,也需要维护一定的数据结构。
- Linux 可以支持多达数十种不同的文件系统。它们的实现各不相同,因此 Linux 内核向用户空间提供了虚拟文件系统这个统一的接口,来对文件系统进行操作。它提供了常见的文件系统对象模型,例如 inode、directory entry、mount 等,以及操作这些对象的方法,例如 inode operations、directory operations、file operations 等。
- 然后就是对接的是真正的文件系统,例如我们上节讲的 ext4 文件系统。
- 为了读写 ext4 文件系统,要通过块设备 I/O 层,也即 BIO 层。这是文件系统层和块设备驱动的接口。
- 为了加快块设备的读写效率,我们还有一个缓存层。
- 最下层是块设备驱动程序。
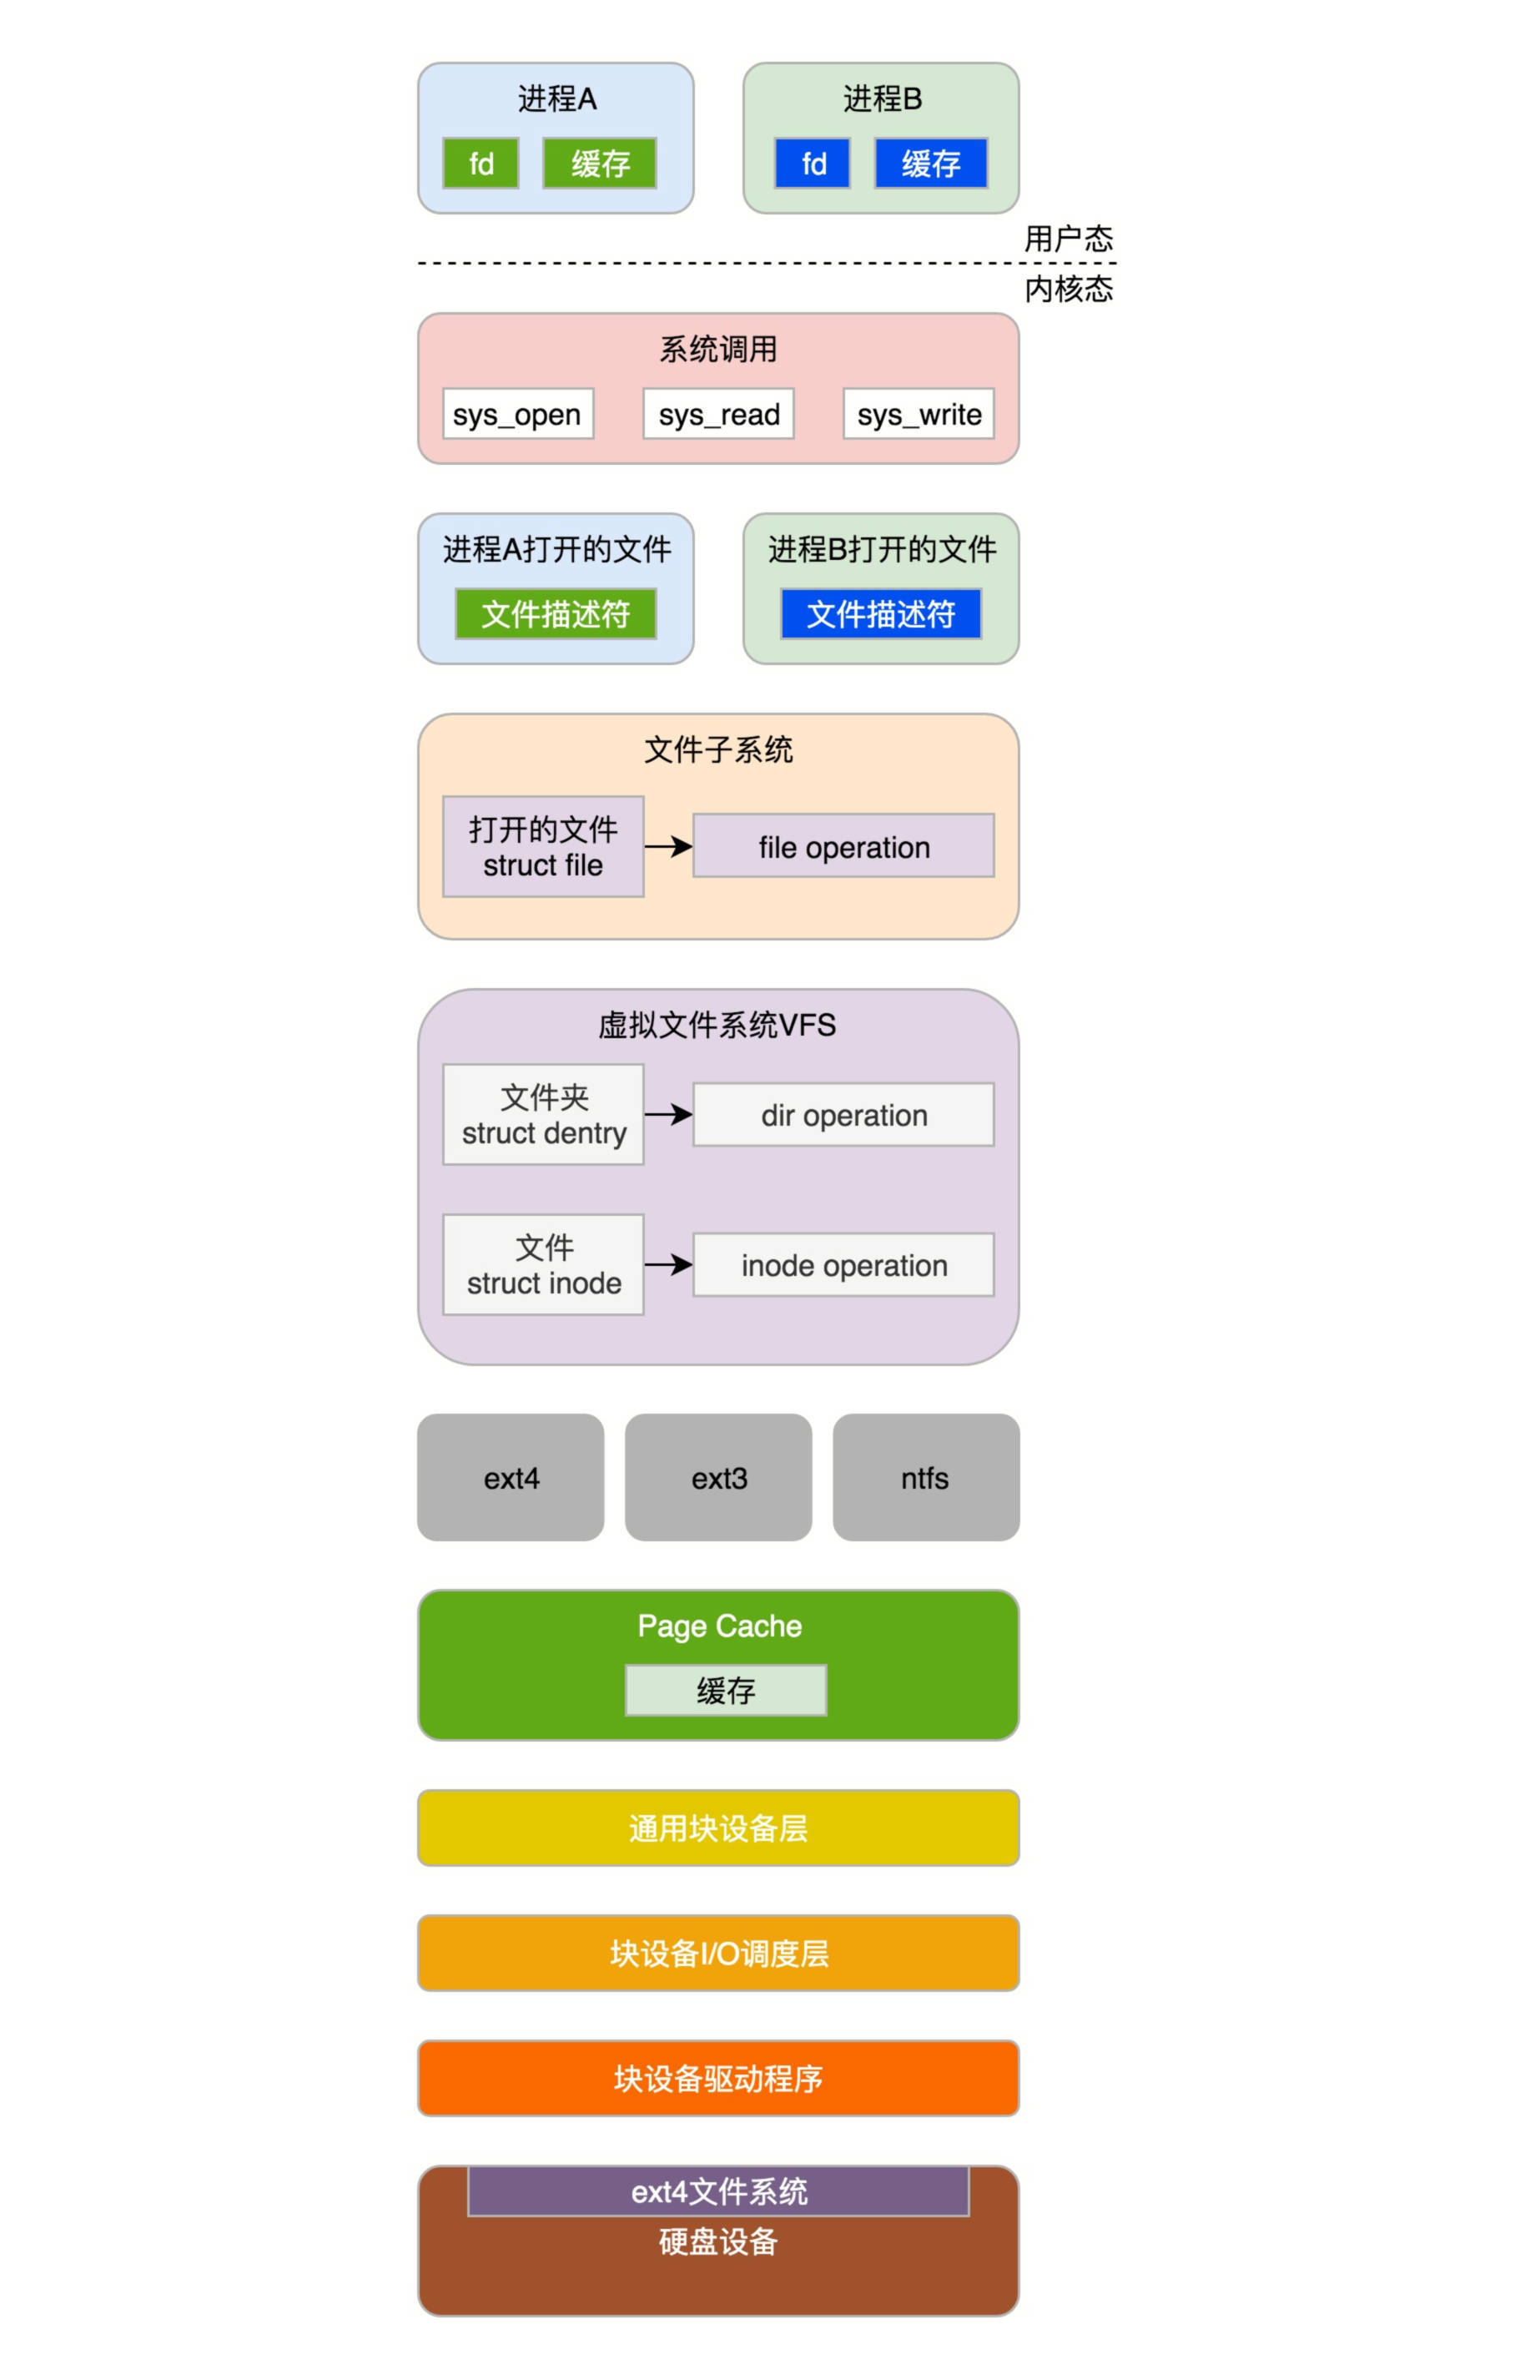
接下来我们逐层解析。
在这之前,有一点你需要注意。解析系统调用是了解内核架构最有力的一把钥匙,这里我们只要重点关注这几个最重要的系统调用就可以了:
- mount 系统调用用于挂载文件系统;
- open 系统调用用于打开或者创建文件,创建要在 flags 中设置 O_CREAT,对于读写要设置 flags 为 O_RDWR;
- read 系统调用用于读取文件内容;
- write 系统调用用于写入文件内容。
挂载文件系统
想要操作文件系统,第一件事情就是挂载文件系统。
内核是不是支持某种类型的文件系统,需要我们进行注册才能知道。例如,咱们上一节解析的 ext4 文件系统,就需要通过 register_filesystem 进行注册,传入的参数是 ext4_fs_type,表示注册的是 ext4 类型的文件系统。这里面最重要的一个成员变量就是 ext4_mount。记住它,这个我们后面还会用。
如果一种文件系统的类型曾经在内核注册过,这就说明允许你挂载并且使用这个文件系统。
刚才我说了几个需要重点关注的系统调用,那我们就从第一个 mount 系统调用开始解析。mount 系统调用的定义如下:
接下来的调用链为:do_mount->do_new_mount->vfs_kern_mount。
vfs_kern_mount 先是创建 struct mount 结构,每个挂载的文件系统都对应于这样一个结构。
其中,mnt_parent 是装载点所在的父文件系统,mnt_mountpoint 是装载点在父文件系统中的 dentry;struct dentry 表示目录,并和目录的 inode 关联;mnt_root 是当前文件系统根目录的 dentry,mnt_sb 是指向超级块的指针。
接下来,我们来看调用 mount_fs 挂载文件系统。
这里调用的是 ext4_fs_type 的 mount 函数,也就是咱们上面提到的 ext4_mount,从文件系统里面读取超级块。在文件系统的实现中,每个在硬盘上的结构,在内存中也对应相同格式的结构。当所有的数据结构都读到内存里面,内核就可以通过操作这些数据结构,来操作文件系统了。
可以看出来,理解各个数据结构在这里的关系,非常重要。我这里举一个例子,来解析经过 mount 之后,刚刚那些数据结构之间的关系。
我们假设根文件系统下面有一个目录 home,有另外一个文件系统 A 挂载在这个目录 home 下面。在文件系统 A 的根目录下面有另外一个文件夹 hello。由于文件系统 A 已经挂载到了目录 home 下面,所以我们就有了目录 /home/hello,然后有另外一个文件系统 B 挂在在 /home/hello 下面。在文件系统 B 的根目录下面有另外一个文件夹 world,在 world 下面有个文件夹 data。由于文件系统 B 已经挂载到了 /home/hello 下面,所以我们就有了目录 /home/hello/world/data。
为了维护这些关系,操作系统创建了这一系列数据结构。具体你可以看下面的图。
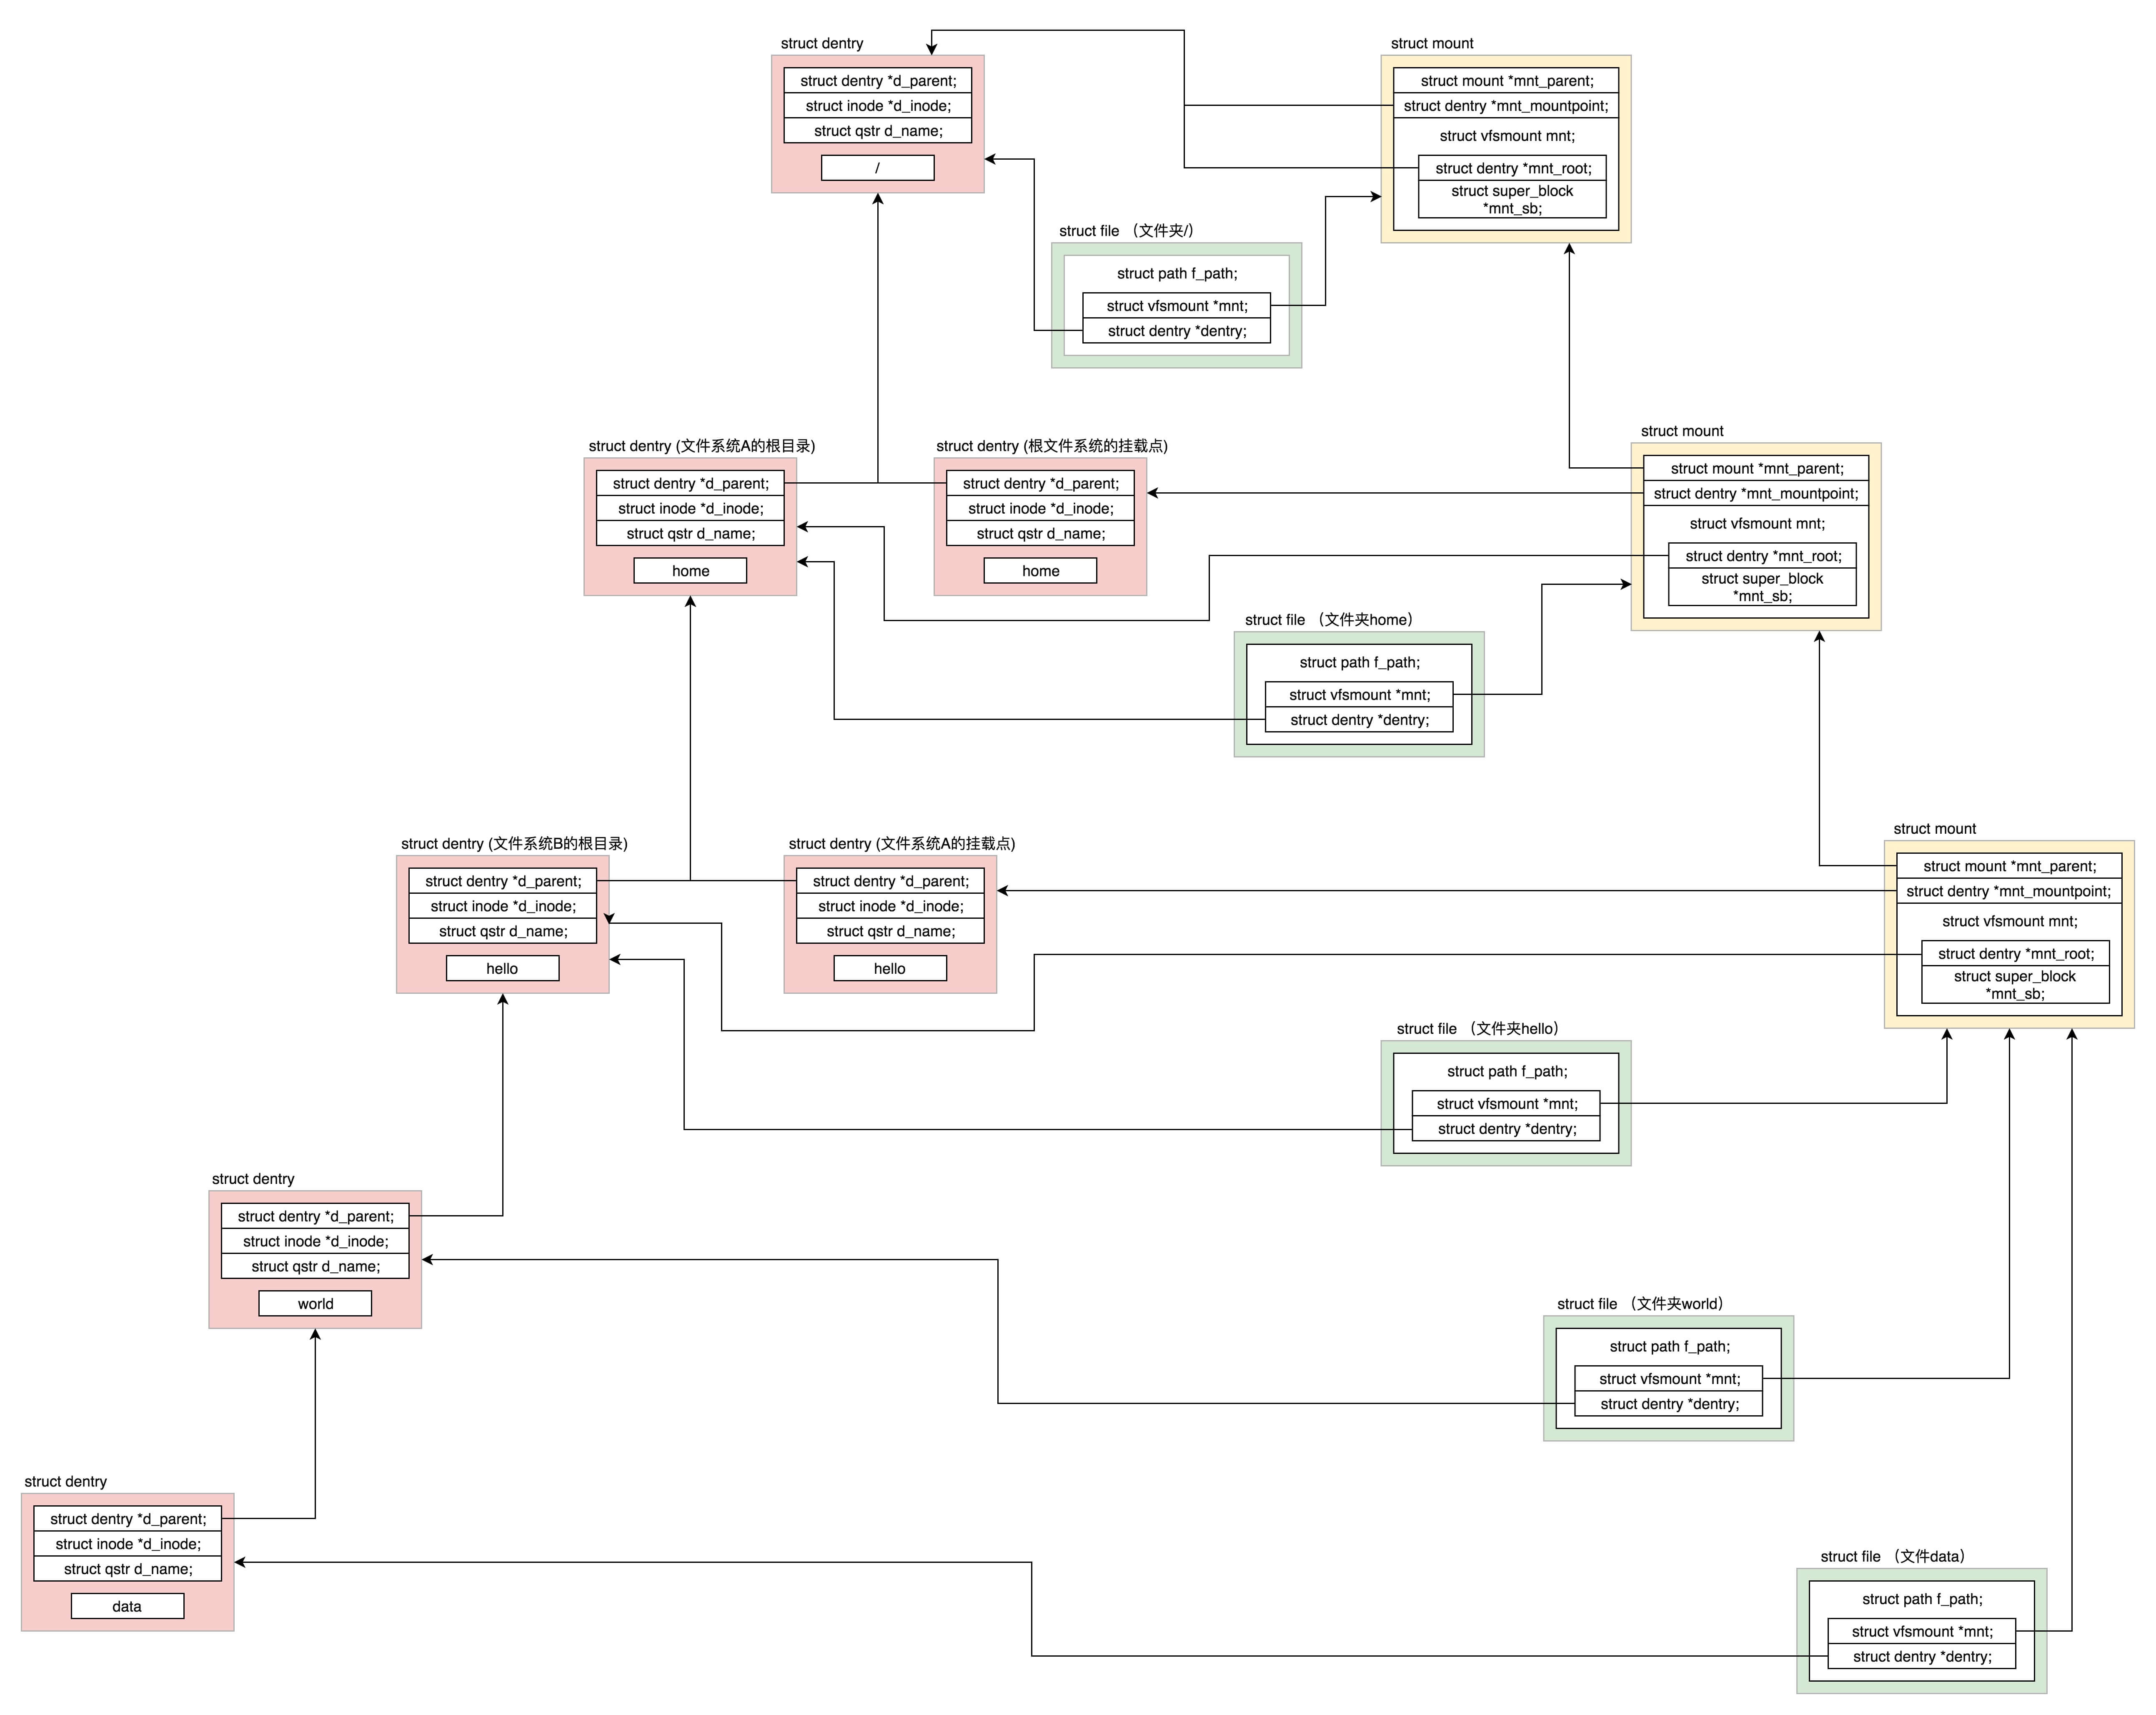
文件系统是树形关系。如果所有的文件夹都是几代单传,那就变成了一条线。你注意看图中的三条斜线。
第一条线是最左边的向左斜的dentry 斜线。每一个文件和文件夹都有 dentry,用于和 inode 关联。第二条线是最右面的向右斜的mount 斜线,因为这个例子涉及两次文件系统的挂载,再加上启动的时候挂载的根文件系统,一共三个 mount。第三条线是中间的向右斜的file 斜线,每个打开的文件都有一个 file 结构,它里面有两个变量,一个指向相应的 mount,一个指向相应的 dentry。
我们从最上面往下看。根目录 / 对应一个 dentry,根目录是在根文件系统上的,根文件系统是系统启动的时候挂载的,因而有一个 mount 结构。这个 mount 结构的 mount point 指针和 mount root 指针都是指向根目录的 dentry。根目录对应的 file 的两个指针,一个指向根目录的 dentry,一个指向根目录的挂载结构 mount。
我们再来看第二层。下一层目录 home 对应了两个 dentry,而且它们的 parent 都指向第一层的 dentry。这是为什么呢?这是因为文件系统 A 挂载到了这个目录下。这使得这个目录有两个用处。一方面,home 是根文件系统的一个挂载点;另一方面,home 是文件系统 A 的根目录。
因为还有一次挂载,因而又有了一个 mount 结构。这个 mount 结构的 mount point 指针指向作为挂载点的那个 dentry。mount root 指针指向作为根目录的那个 dentry,同时 parent 指针指向第一层的 mount 结构。home 对应的 file 的两个指针,一个指向文件系统 A 根目录的 dentry,一个指向文件系统 A 的挂载结构 mount。
我们再来看第三层。目录 hello 又挂载了一个文件系统 B,所以第三层的结构和第二层几乎一样。
接下来是第四层。目录 world 就是一个普通的目录。只要它的 dentry 的 parent 指针指向上一层就可以了。我们来看 world 对应的 file 结构。由于挂载点不变,还是指向第三层的 mount 结构。
接下来是第五层。对于文件 data,是一个普通的文件,它的 dentry 的 parent 指向第四层的 dentry。对于 data 对应的 file 结构,由于挂载点不变,还是指向第三层的 mount 结构。
打开文件
接下来,我们从分析 Open 系统调用说起。
在系统调用的那一节,我们知道,在进程里面通过 open 系统调用打开文件,最终对调用到内核的系统调用实现 sys_open。当时我们仅仅解析了系统调用的原理,没有接着分析下去,现在我们接着分析这个过程。
要打开一个文件,首先要通过 get_unused_fd_flags 得到一个没有用的文件描述符。如何获取这个文件描述符呢?
在每一个进程的 task_struct 中,有一个指针 files,类型是 files_struct。
files_struct 里面最重要的是一个文件描述符列表,每打开一个文件,就会在这个列表中分配一项,下标就是文件描述符。
对于任何一个进程,默认情况下,文件描述符 0 表示 stdin 标准输入,文件描述符 1 表示 stdout 标准输出,文件描述符 2 表示 stderr 标准错误输出。另外,再打开的文件,都会从这个列表中找一个空闲位置分配给它。
文件描述符列表的每一项都是一个指向 struct file 的指针,也就是说,每打开一个文件,都会有一个 struct file 对应。
do_sys_open 中调用 do_filp_open,就是创建这个 struct file 结构,然后 fd_install(fd, f) 是将文件描述符和这个结构关联起来。
do_filp_open 里面首先初始化了 struct nameidata 这个结构。我们知道,文件都是一串的路径名称,需要逐个解析。这个结构就是解析和查找路径的时候做辅助作用。
在 struct nameidata 里面有一个关键的成员变量 struct path。
其中,struct vfsmount 和文件系统的挂载有关。另一个 struct dentry,除了上面说的用于标识目录之外,还可以表示文件名,还会建立了文件名及其 inode 之间的关联。
接下来就调用 path_openat,主要做了以下几件事情:
- get_empty_filp 生成一个 struct file 结构;
- path_init 初始化 nameidata,准备开始节点路径查找;
- link_path_walk 对于路径名逐层进行节点路径查找,这里面有一个大的循环,用“/”分隔逐层处理;
- do_last 获取文件对应的 inode 对象,并且初始化 file 对象。
例如,文件“/root/hello/world/data”,link_path_walk 会解析前面的路径部分“/root/hello/world”,解析完毕的时候 nameidata 的 dentry 为路径名的最后一部分的父目录“/root/hello/world”,而 nameidata 的 filename 为路径名的最后一部分“data”。
最后一部分的解析和处理,我们交给 do_last。
在这里面,我们需要先查找文件路径最后一部分对应的 dentry。如何查找呢?
Linux 为了提高目录项对象的处理效率,设计与实现了目录项高速缓存 dentry cache,简称 dcache。它主要由两个数据结构组成:
- 哈希表 dentry_hashtable:dcache 中的所有 dentry 对象都通过 d_hash 指针链到相应的 dentry 哈希链表中;
- 未使用的 dentry 对象链表 s_dentry_lru:dentry 对象通过其 d_lru 指针链入 LRU 链表中。LRU 的意思是最近最少使用,我们已经好几次看到它了。只要有它,就说明长时间不使用,就应该释放了。
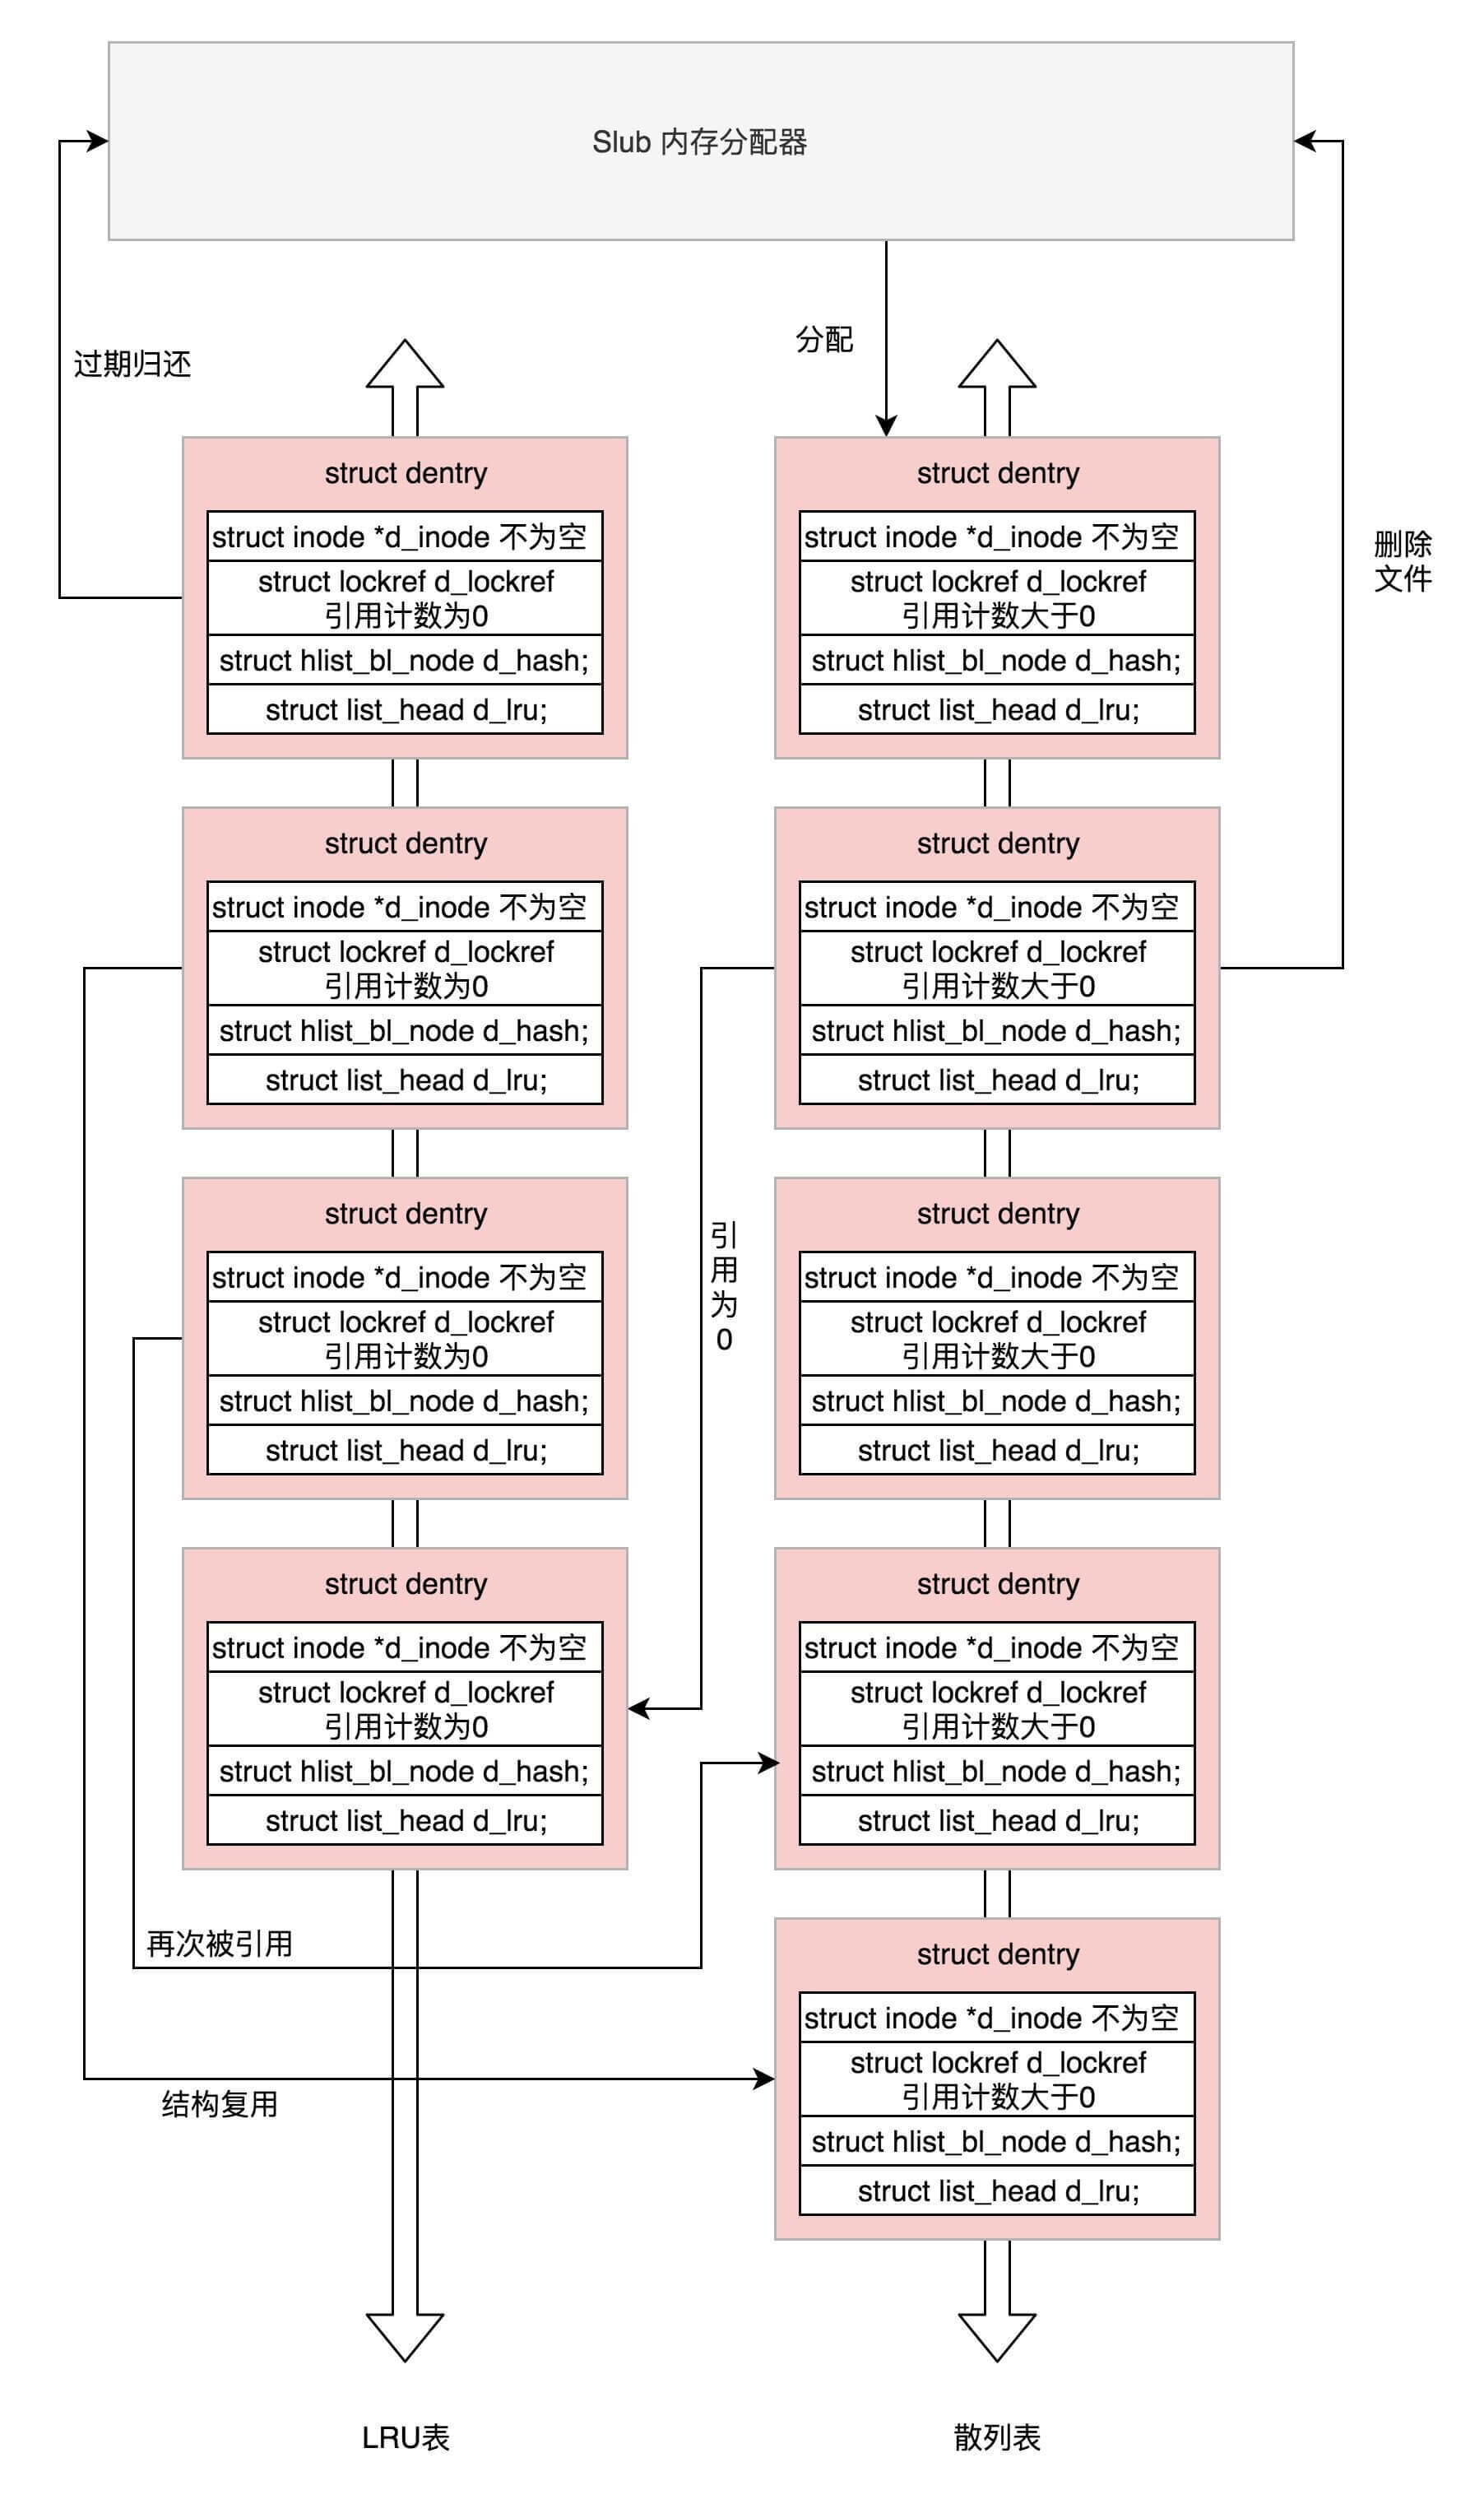
这两个列表之间会产生复杂的关系:
- 引用为 0:一个在散列表中的 dentry 变成没有人引用了,就会被加到 LRU 表中去;
- 再次被引用:一个在 LRU 表中的 dentry 再次被引用了,则从 LRU 表中移除;
- 分配:当 dentry 在散列表中没有找到,则从 Slub 分配器中分配一个;
- 过期归还:当 LRU 表中最长时间没有使用的 dentry 应该释放回 Slub 分配器;
- 文件删除:文件被删除了,相应的 dentry 应该释放回 Slub 分配器;
- 结构复用:当需要分配一个 dentry,但是无法分配新的,就从 LRU 表中取出一个来复用。
所以,do_last() 在查找 dentry 的时候,当然先从缓存中查找,调用的是 lookup_fast。
如果缓存中没有找到,就需要真的到文件系统里面去找了,lookup_open 会创建一个新的 dentry,并且调用上一级目录的 Inode 的 inode_operations 的 lookup 函数,对于 ext4 来讲,调用的是 ext4_lookup,会到咱们上一节讲的文件系统里面去找 inode。最终找到后将新生成的 dentry 付给 path 变量。
do_last() 的最后一步是调用 vfs_open 真正打开文件。
vfs_open 里面最终要做的一件事情是,调用 f_op->open,也就是调用 ext4_file_open。另外一件重要的事情是将打开文件的所有信息,填写到 struct file 这个结构里面。
总结时刻
对于虚拟文件系统的解析就到这里了,我们可以看出,有关文件的数据结构层次多,而且很复杂,就得到了下面这张图,这张图在这个专栏最开始的时候,已经展示过一遍,到这里,你应该能明白它们之间的关系了。
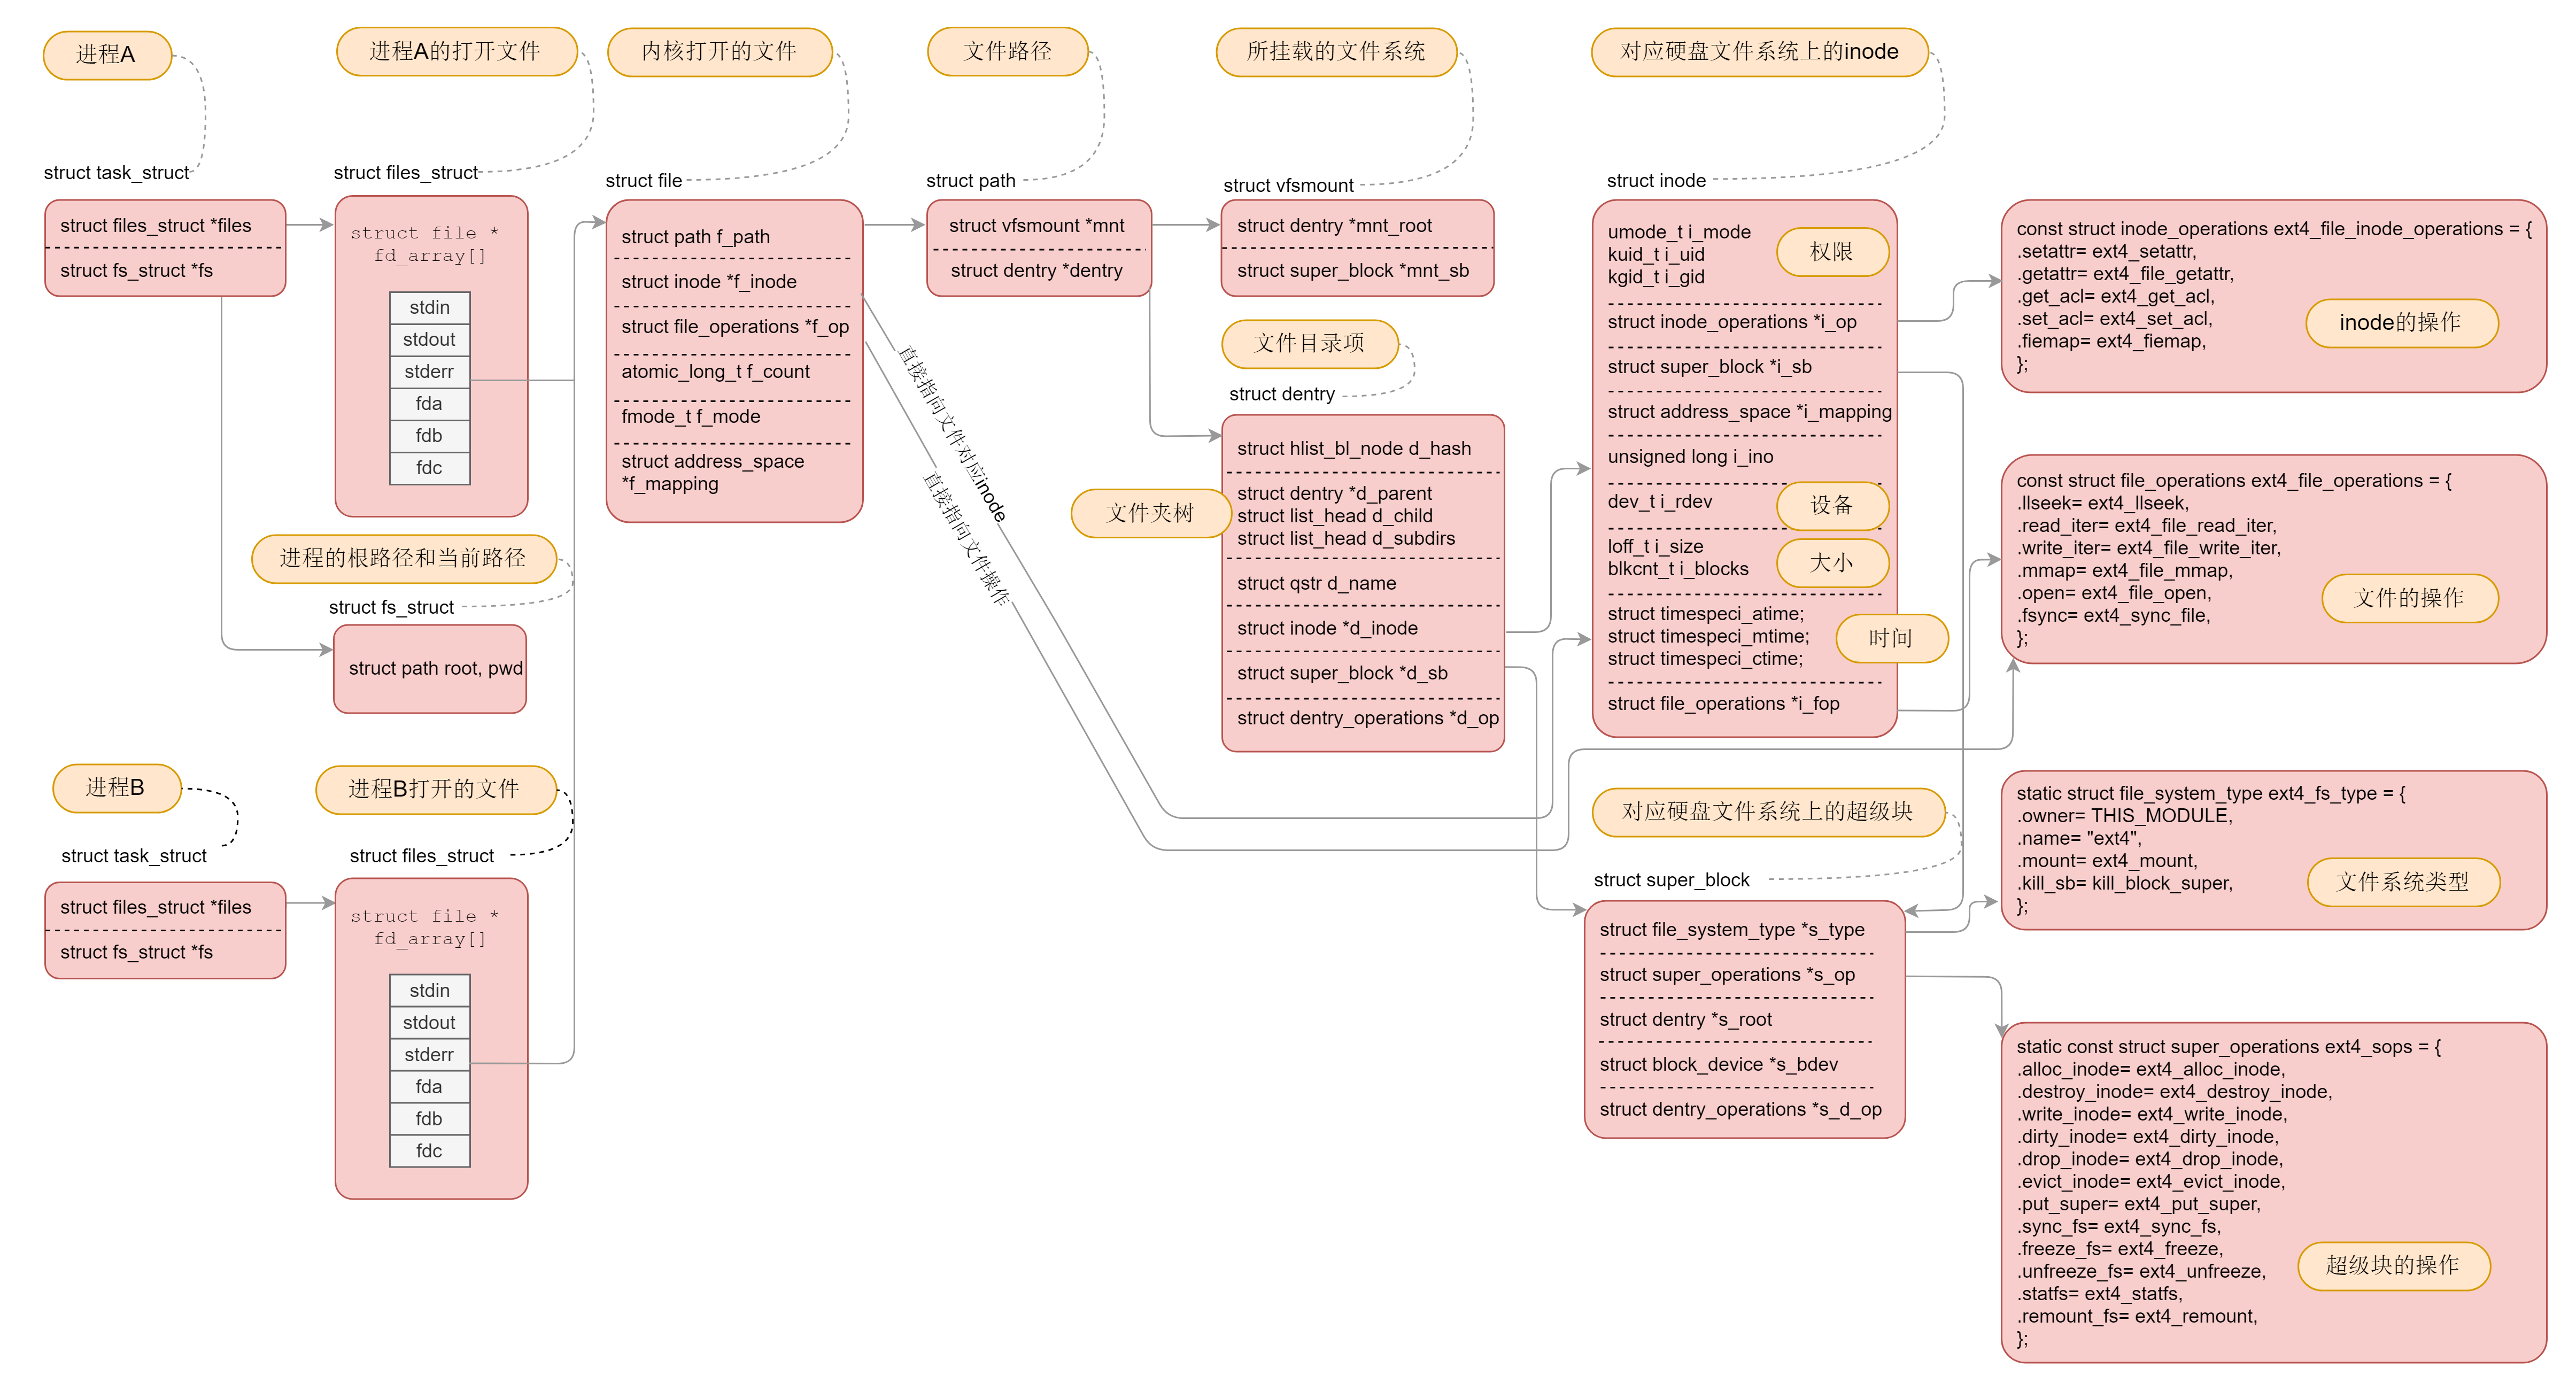
这张图十分重要,一定要掌握。因为我们后面的字符设备、块设备、管道、进程间通信、网络等等,全部都要用到这里面的知识。希望当你再次遇到它的时候,能够马上说出各个数据结构直接的关系。
这里我带你简单做一个梳理,帮助你理解记忆它。
对于每一个进程,打开的文件都有一个文件描述符,在 files_struct 里面会有文件描述符数组。每个一个文件描述符是这个数组的下标,里面的内容指向一个 file 结构,表示打开的文件。这个结构里面有这个文件对应的 inode,最重要的是这个文件对应的操作 file_operation。如果操作这个文件,就看这个 file_operation 里面的定义了。
对于每一个打开的文件,都有一个 dentry 对应,虽然叫作 directory entry,但是不仅仅表示文件夹,也表示文件。它最重要的作用就是指向这个文件对应的 inode。
如果说 file 结构是一个文件打开以后才创建的,dentry 是放在一个 dentry cache 里面的,文件关闭了,他依然存在,因而他可以更长期的维护内存中的文件的表示和硬盘上文件的表示之间的关系。
inode 结构就表示硬盘上的 inode,包括块设备号等。
几乎每一种结构都有自己对应的 operation 结构,里面都是一些方法,因而当后面遇到对于某种结构进行处理的时候,如果不容易找到相应的处理函数,就先找这个 operation 结构,就清楚了。
课堂练习
上一节的总结中,我们说,同一个文件系统中,文件夹和文件的对应关系。如果跨的是文件系统,你知道如何维护这种映射关系吗?
欢迎留言和我分享你的疑惑和见解 ,也欢迎可以收藏本节内容,反复研读。你也可以把今天的内容分享给你的朋友,和他一起学习和进步。

精选留言(2)
 刘強2019-06-03老师,挂载文件系统数据结构的那个图是不是有个小错误,第二层(/home目录)应该是文件系统A的挂载点,第三层(/home/hello)是文件系统B的挂载点。第一层(/)应该是跟文件系统的挂载点。是这样理解吗?展开
 安排2019-06-03老师,能否讲一下读写裸设备和读写设备上的文件的细节方面的区别展开